Monday, August 26, 2013

Baby Bat-Mobile

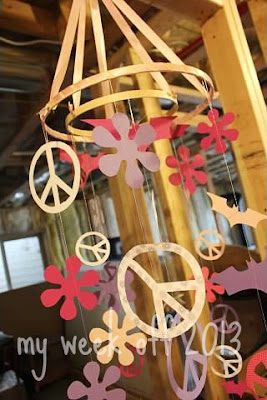
I have a coworker who is obsessed with Batman.  And I mean Obsessed in every sense of the word.  His cute wife is pregnant with their first--a girl--due at the end of September.  We had a baby shower for her last week and I was asked to come up with some decorations.  Through a series of brainstorming I had this brilliant idea that I could string together a bunch of Batman symbols, cut out of girlish paper, make a baby mobile out of them, and call it the BATMOBILE.  I thought I was so creative.  Turns out if you Google-image Baby Bat-mobile you get all sorts of people who had the same idea.  Oh well.  My coworkers' wife's loves include the Beatles so, to include her interests in the project, I found peace sign and 60's flower clipart.

I cut out far more than I needed and, after stringing it together using a sewing machine, discovered that the mobile was twice as long as I had anticipated.  But it did look so cute hanging from the ceiling during the baby shower.


I've never made one of these before so I had to kind of guess how to put it together.  I found a couple of cheap quilting hoops at Hobby Lobby and used the interior frames (if anyone has a need for some exterior extendable frames, let me know.  I have no idea what to do with them now.)  I bought some 1/2 inch pink satin ribbon.  To create the hanging apparatus, I punched some tiny holes through the wooden ring using my heavy-duty Crop-a-Dile.  (I don't know for sure, but I suspect it's the only paper-crafting tool strong enough to punch a small hole through thick wood.)  I took six lengths of satin ribbon and threaded each through a hole, knotting each on the outside of the hoop.  I used the leftover ribbon and wound it around the outer hoop to give it a finishing touch.

The most time consuming part of the project was hand cutting each of the paper pieces.  After that was done, it went together really easily.  I think I might just try this again sometime!  Just not using batman pieces.

Monday, August 12, 2013

Cookies and Cream Cupcakes

I made these cupcakes for a friend's birthday a few weeks ago and they are AMAZING!  And so easy, too, especially considering that you have to make the cupcakes from scratch.  And the frosting actually tastes like Oreo cookie filling.  I don't know how Bakerella comes up with her ideas...

The original instructions have you pipe the frosting on top but apparently I need to buy a larger star tip because mine was just small enough that the cookie bits kept getting stuck and making a big mess.  So I resorted to the good ol' spoon-it-on-and-spread method (which worked just fine.)


Cookies and Cream Cupcakes from Bakerella

Cupcakes:
1 1/2 cups all purpose flour
1/2 cup unsweetened cocoa (I used Hershey's Dark)
1 1/4 cup sugar
3/4 teaspoon baking soda
1/2 teaspoon baking powder
1/2 teaspoon salt
2 eggs
1/2 cup vegetable oil
1 teaspoon vanilla
3/4 cup milk
3/4 cup hot water
24 Oreos, plus more for crumbs

Frosting:
1 cup shortening
1 lb. powdered sugar
1 teaspoon vanilla
3-6 Tablespoons milk
2 or more teaspoons Oreo crumbs

For the cupcakes:
Preheat the oven to 350 degrees.  Line tray with 12 baking cups.  Break up one cookie per cup into pieces and place in bottom of cup.  Mix the flour, cocoa, sugar, baking soda, baking powder and salt with a wire whisk.  Add the eggs, oil, vanilla and milk and mix well.  Add hot water and mix until combined.  Transfer the batter (it will be very liquid) to a large measuring cup.  Fill each baking cup so it's about three quarters full.  Bake for 16-18 minutes.

For the frosting:
Beat the shortening in a mixer until smooth.  Add vanilla and mix until combined.  Add the powdered sugar in three additions.  Add a Tablespoon of milk at a time and mix until smooth.  Add the cookie crumbs and blend thoroughly.  Frost each cupcake and insert half a cookie on top of each cupcake.

Monday, August 5, 2013

Monster Party Set-Up

I feel like I should have had a sign at my son's first birthday party saying, 'This party is brought to you by Pinterest!'  I wish I could take credit for the set-up of this party, but it truly is a mix of several ideas I found on Pinterest in the months leading up to his party.

For my daughter's birthday last year, we had balloons leading up the sidewalk to our house and most of them popped.  When I saw this idea to use pinwheels I thought it was great!  I just designed the '1' emblem using Photoshop Elements, had them printed, punched a hole in the center, and slid it onto a store-bought pinwheel.  I thought they turned out darling!


The refreshment table was a big hit!  I really wanted soda bottles but thought they could get pricey really fast.  So when I found these sodas on sale 2 for $5 I felt like I'd hit the lottery!


I had pitchers of lemonade and lemon-lime water.  The cake and cake-balls, of course, were displayed (and gobbled up.)


One of the favorite ideas I found was to cut monster-face-type shapes out of meat and cheese to make mini-monster sandwiches.  I also made rice krispy treats and dipped them to look like monsters.


Along the same lines as the monster cheese cracker sandwiches, I cut up a watermelon and punched out star-shaped watermelon.  It was ridiculously easy and looked really, really cute!


Probably the best idea I found on Pinterest was to set up a mini-bar for the kiddos.  It only makes sense to have food at the party that the one-year-old and his buddies can enjoy!  This was almost too-big of a hit.  There were crackers and goodies in the jars and a basket of Plum brand toddler smoothies.  The candy in the jars was there, along with toothpicks and icing, to 'make your own monster.'  There was no candy left by the end of the party (and I'm not sure it all went into making monsters!)


I didn't have a lot in the way of favors and games, but I did find this cute idea to have a poster of pictures from the previous year for guests to guess how old my son was in each square.  Probably my favorite thing of all was the 'Adopt a Monster' basket of felt monsters I sewed together.  The kids (and some adults, too) loved them!