Monday, December 30, 2013

German Chocolate Brownies

I have no picture which is too bad.  These were one of those recipes I made that was gone before I had a chance to take a picture!  Also they were kind of messy, and messy isn't pretty.  Anyway, just imagine german chocolate cake except a brownie instead of cake.  Delicious!

German Chocolate Brownies (adapted from iheartnaptime.net)

Brownies
  • 2 boxes of brownie mix
  • 1 cup of chocolate chips
  • 1 cup of butterscotch chips
Coconut Pecan Frosting
  • 3 egg yolks
  • 1 cup sugar
  • 1 cup evaporated milk
  • 1/2 cup butter
  • 1 t. vanilla
  • 1 1/2 cups flaked coconut
  • 1 cup pecans, chopped
  1. Bake brownies according to package directions.  Allow to cool
  2. Melt chocolate chips in microwave for 1 minute and drizzle with a spoon over brownies.
  3. Melt butterscotch chips in microwave for 1 minute and drizzle over chocolate.
  4. Combine egg yolks, sugar, milk, butter and vanilla in a large saucepan.  Cook and stir over medium heat until thickened, about 12 minutes, stirring consistently for at least 10 of those minutes.  Add coconut and pecans.  Beat until thick enough to spread.  Pour over top of brownies.  Place in refrigerator to harden.

Monday, December 23, 2013

Black and White Potato Chip Cookies

I have finished my goal of making baked goodies for each coworker on their birthday!  Unfortunately, the person these cookies were for wasn't there the day I brought them in and they had disappeared by the next day.

What I liked:
Another coworker actually pointed this out but these cookies are like Ben & Jerry's Late Night Snack.  Sweet and Salty is super Yum!

What I would do differently:
I would like to try these cookies undipped.


from The Chew

1 cup butter softened
3/4 cup granulated sugar
11/4 cups crushed potato chips
1teaspion vanilla
2c all purpose flour
Confectioner sugar
1c chocolate chips


  1. Preheat oven to 350
  2. Cream butter and sugar until fluffy.  Reduce speed to low and add 3/4 c of potato chips and mix until incorporated.  Add vanilla and mix until thoroughly combined.  Add the flour and mix just until combined--don't overmix.
  3. Scoop 1-inch balls of dough into a lightly greased sheet pan, spacing them at least 2 inches apart.  Dust each cookie w/ confectioner sugar and press flat.
  4. Bake 10-15 minutes until golden brown and cool. Dip cookies in melted chocolate then into crushed potato chips.

Monday, December 16, 2013

Oobleck

Earlier this year I did another fun 'science experiment' with my daughter for preschool.  This time we made Oobleck.  As in Oobleck from Dr. Suess.  It's a simple 2 ingredient mixture that turns to solid in a bowl but back into liquid in your hands.  Even I, the supposed adult in the situation, had a lot of fun playing with the stuff!


from Spoonful

Ingredients:
1 1/2 to 2 cups cornstarch
1 cup water

Instructions:
  1. Take 1 1/2 cups of cornstarch and add 1 cup of water.  Mix.  If the 'goo' isn't gooey enough, add a little more water.  Keep adding water until you have a consistency that is relatively easy to stir, but not runny.
  2. This may look like a messy project but it cleans up very quickly with extra water

Monday, September 9, 2013

Airplane Birth Announcement

My great-nephew was born, oh, 2 years ago so I'm finishing this up right on time!  Incidentally I just bought the kit for my one-year old son's announcement so I should be finishing it by his second birthday as well :)

This nephew is the grandson of my brother who is really into aviation so it somehow seemed appropriate.  It was really quick to put together, actually.  The longest part was getting it over to the framer.  And mailing it. 

I took it to The Framing Establishment again.  The frame is actually the same kind that they used on my daughter's except in red.  It's a really cute, whimsical frame that looks cute in kids' rooms. I apologize for the quality of the picture: I realized halfway through wrapping it that I hadn't taken a picture yet!  Plus the whole anonymity censor ugly white square thing...

Monday, September 2, 2013

Dipped Oreo Cookies

My daughter recently turned 4 and we did a big barbecue for her birthday.  It was great.  Much more low-key than my son's party.  There was a birthday cake, of course, and instead of ice cream: otter pops.  My favorite dessert item, though, were these yummy Dipped Oreo Cookies.


These are ridiculously easy to make.  Oh, and by the way, I got the idea off of Pinterest.  Obviously.

I just took a pack of Oreos, melted down some white, vanilla candy wafers, dipped half of the Oreo cookie in and sprinkled it with colorful nonpareils.  I set up my cookie rack with a sheet of waxed paper underneath it for the cookies to dry on.  Cute and Yummy!

Monday, August 26, 2013

Baby Bat-Mobile

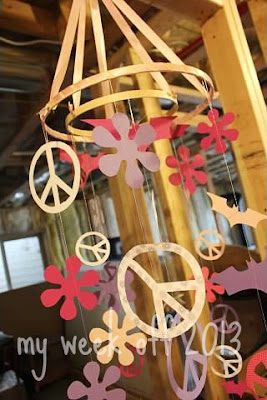
I have a coworker who is obsessed with Batman.  And I mean Obsessed in every sense of the word.  His cute wife is pregnant with their first--a girl--due at the end of September.  We had a baby shower for her last week and I was asked to come up with some decorations.  Through a series of brainstorming I had this brilliant idea that I could string together a bunch of Batman symbols, cut out of girlish paper, make a baby mobile out of them, and call it the BATMOBILE.  I thought I was so creative.  Turns out if you Google-image Baby Bat-mobile you get all sorts of people who had the same idea.  Oh well.  My coworkers' wife's loves include the Beatles so, to include her interests in the project, I found peace sign and 60's flower clipart.

I cut out far more than I needed and, after stringing it together using a sewing machine, discovered that the mobile was twice as long as I had anticipated.  But it did look so cute hanging from the ceiling during the baby shower.


I've never made one of these before so I had to kind of guess how to put it together.  I found a couple of cheap quilting hoops at Hobby Lobby and used the interior frames (if anyone has a need for some exterior extendable frames, let me know.  I have no idea what to do with them now.)  I bought some 1/2 inch pink satin ribbon.  To create the hanging apparatus, I punched some tiny holes through the wooden ring using my heavy-duty Crop-a-Dile.  (I don't know for sure, but I suspect it's the only paper-crafting tool strong enough to punch a small hole through thick wood.)  I took six lengths of satin ribbon and threaded each through a hole, knotting each on the outside of the hoop.  I used the leftover ribbon and wound it around the outer hoop to give it a finishing touch.

The most time consuming part of the project was hand cutting each of the paper pieces.  After that was done, it went together really easily.  I think I might just try this again sometime!  Just not using batman pieces.

Monday, August 12, 2013

Cookies and Cream Cupcakes

I made these cupcakes for a friend's birthday a few weeks ago and they are AMAZING!  And so easy, too, especially considering that you have to make the cupcakes from scratch.  And the frosting actually tastes like Oreo cookie filling.  I don't know how Bakerella comes up with her ideas...

The original instructions have you pipe the frosting on top but apparently I need to buy a larger star tip because mine was just small enough that the cookie bits kept getting stuck and making a big mess.  So I resorted to the good ol' spoon-it-on-and-spread method (which worked just fine.)


Cookies and Cream Cupcakes from Bakerella

Cupcakes:
1 1/2 cups all purpose flour
1/2 cup unsweetened cocoa (I used Hershey's Dark)
1 1/4 cup sugar
3/4 teaspoon baking soda
1/2 teaspoon baking powder
1/2 teaspoon salt
2 eggs
1/2 cup vegetable oil
1 teaspoon vanilla
3/4 cup milk
3/4 cup hot water
24 Oreos, plus more for crumbs

Frosting:
1 cup shortening
1 lb. powdered sugar
1 teaspoon vanilla
3-6 Tablespoons milk
2 or more teaspoons Oreo crumbs

For the cupcakes:
Preheat the oven to 350 degrees.  Line tray with 12 baking cups.  Break up one cookie per cup into pieces and place in bottom of cup.  Mix the flour, cocoa, sugar, baking soda, baking powder and salt with a wire whisk.  Add the eggs, oil, vanilla and milk and mix well.  Add hot water and mix until combined.  Transfer the batter (it will be very liquid) to a large measuring cup.  Fill each baking cup so it's about three quarters full.  Bake for 16-18 minutes.

For the frosting:
Beat the shortening in a mixer until smooth.  Add vanilla and mix until combined.  Add the powdered sugar in three additions.  Add a Tablespoon of milk at a time and mix until smooth.  Add the cookie crumbs and blend thoroughly.  Frost each cupcake and insert half a cookie on top of each cupcake.

Monday, August 5, 2013

Monster Party Set-Up

I feel like I should have had a sign at my son's first birthday party saying, 'This party is brought to you by Pinterest!'  I wish I could take credit for the set-up of this party, but it truly is a mix of several ideas I found on Pinterest in the months leading up to his party.

For my daughter's birthday last year, we had balloons leading up the sidewalk to our house and most of them popped.  When I saw this idea to use pinwheels I thought it was great!  I just designed the '1' emblem using Photoshop Elements, had them printed, punched a hole in the center, and slid it onto a store-bought pinwheel.  I thought they turned out darling!


The refreshment table was a big hit!  I really wanted soda bottles but thought they could get pricey really fast.  So when I found these sodas on sale 2 for $5 I felt like I'd hit the lottery!


I had pitchers of lemonade and lemon-lime water.  The cake and cake-balls, of course, were displayed (and gobbled up.)


One of the favorite ideas I found was to cut monster-face-type shapes out of meat and cheese to make mini-monster sandwiches.  I also made rice krispy treats and dipped them to look like monsters.


Along the same lines as the monster cheese cracker sandwiches, I cut up a watermelon and punched out star-shaped watermelon.  It was ridiculously easy and looked really, really cute!


Probably the best idea I found on Pinterest was to set up a mini-bar for the kiddos.  It only makes sense to have food at the party that the one-year-old and his buddies can enjoy!  This was almost too-big of a hit.  There were crackers and goodies in the jars and a basket of Plum brand toddler smoothies.  The candy in the jars was there, along with toothpicks and icing, to 'make your own monster.'  There was no candy left by the end of the party (and I'm not sure it all went into making monsters!)


I didn't have a lot in the way of favors and games, but I did find this cute idea to have a poster of pictures from the previous year for guests to guess how old my son was in each square.  Probably my favorite thing of all was the 'Adopt a Monster' basket of felt monsters I sewed together.  The kids (and some adults, too) loved them! 

Monday, July 29, 2013

Birth Announcement

I have always loved making cross-stiched birth announcements for little babies (remember this one?)  The problem is that I am usually really behind on finishing them.  For example, the one I made for my daughter.  She turns 4 next month.

I had initially bought this pattern several years ago for a nephew being born.  In the catalog's tiny picture it seemed perfectly masculine but as it arrived and I started working on it I realized this would be more appropriate for a little girl.  So I put it away and kind of forgot about it.

Then when I was cleaning up my upstairs craft room to move to my new one in the basement, I found it and decided it would be perfect to finish for my daughter.

I got it framed at this place.  They are amazing!  It costs a little more to get things professionally framed but it is well worth it, especially when it comes to fabric.  And these guys do the best job of anyone I've found.


My daughter knew just where to put it.

Monday, July 22, 2013

Monster Cake for a First Birthday

I found an idea similar to this one on Pinterest and I thought it would be perfect for my one-year-old's first birthday party.


Again, being short on time, I made the cake layers the week before the party.  I made 9-, 8- and 6-inch rounds out of boxed funfetti cake mixes (it took 2 to make these 3 layers.)  Once they had cooled I wrapped each layer in a sheet of waxed paper and then a sheet of aluminum foil.  This time I took the layers out the morning that I frosted the cake (I figured they might be easier to handle if they were still partially frozen.)  I used a can of vanilla frosting to do the crumb coating.  This is the beginning of the monster cake:


The frosting I used for decorating is a Meringue Buttercream recipe from Martha Stewart.  It's yummy, but it is much more time consuming than regular ol' powdered sugar based frosting.  I chose this recipe because it stated in the recipe that it was good for decorating--which it completely was!  I frosted the day before the party and the frosting held it's shape perfectly.

I used Americolor gel paste to color the frosting again (they really are the best!!!)  The bottom layer was made using a large star tip (I forget which size.)

The middle layer I used a grass tip.  It totally blew my daughters mind away when she saw that the frosting really was starting to look like monster fur!

The top layer was made using a smaller star tip.  I loved how the colors turned out!


After I was done dipping my monster eyeball cakepops, I used the leftover white chocolate and milk chocolate pieces to make extra eyeball candies.  (Also my daughter is in a major playing-dressup-phase which includes all of her old dance costumes.  Adorable.)


I used 6 of the large eyeball candies for the cake.  Here is the final product again!  With advance planning, this cake really wasn't hard at all to make!!


The man of the hour.  He got to demolish the top layer while the rest of us enjoyed slices of the bottom layer.

Sunday, July 14, 2013

Monster Eyeball Cakepops!

I decided on a monster theme for my one-year old's birthday party (which was last week.)  For the next several weeks I will be posting about some of the things I did for the party.

I've always, always wanted to try making cakepops but for some reason they have always intimidated me.  I've heard several people say how easy they are but I've also read several accounts of how time-consuming they are and that they ended up with disastrous results in the end. 

I did a lot of research and ended up finding this web tutorial.  It worked perfectly!  I'm linking up here so that, not only can I give credit to my source, but that I can easily find it again to make more in the future!

I found all of my monstrous ideas on pinterest, including one for these cakepop eyeballs.  I thought they were so adorable!

I was a little short on time the week leading up to the party so I made the cakeballs and attached the sticks a few weeks before the party.


I found a lot of tips on freezing and thawing cakepops but ultimately I decided to take them out of the freezer the night before I would decorate them and then let them sit at air temp while I prepped the dipping chocolate.  I had no problems whatsoever so, according to my limited knowledge, my technique worked just fine.

After I dipped them in white chocolate, they took a long time to dry so it was several hours before I was able to put the blue 'eyelids' on.  I melted down chocolate candy melts a few weeks prior to make they eye centers and stuck them on while the white chocolate was still wet.  I felt like they needed something a little extra so I made washi tape banners for the sticks (I also needed an excuse to go buy more washi tape.)

Here's the final product!


If I were to do anything differently, I would have opted for white candy melts instead of white chocolate.  Like I said, the white chocolate took forever to dry whereas I feel like the candy melts dry a lot quicker.  I also would have bought 2 styrafoam blocks to use as cakepop stands.

Monday, May 13, 2013

My Week On: Lab Week Edition

So this post really started out as a post about Flower Gems and then turned into a whole "look how crafty our transfusion department was for lab week" thing. 

Flower Gems (aka red blood cells)

These things are SO COOL!  My coworker initially found them to make a string of lights to run down the middle of the lab.  All you do is add water to these tiny, bead-like polymers and they expand to fit their space which, in this case, was test tubes.  Next she popped a light into each tube and this was the result:

The obvious thing to do with these flower gems was to experiment.  I am, after all, a scientist.  I placed one gem in each well of an ABO reagent plate (we use for automated testing, I use for science)

and added water. 

I really hoped that each of these beauties would erupt out their well, but alas they conformed to their space and no further.  Either way, they are still awesome and I can't wait to buy some of these to play with at home.

Tissue Paper Poof Balls (aka white blood cells)

Another coworker of mine made thousands of these for her wedding...so she volunteered to make a few more for our lab week decorations.  They are are also super awesome!  You take a square of tissue paper, fold it accordian style, gather it in the middle, and then poof it out.  Then, if you are the only guy in the department sick of working with craft-hungry chics, you place said poof ball on your head.  And see if anyone notices. 

Bruce, the Hemolygator

I received some parts to do a quick repair on an instrument of ours.  When I was done, I was cleaning up and about to throw the packaging when I paused, looked at it, and thought: that looks like an alligator.  So I found a few pom-poms and drew on a nose.  Then a coworker thought it should be named Bruce and eat red blood cells.  Then another coworker thought "if it eat's red blood cells, it should be called a hemolygator."  So that's how Bruce, the Hemolygator and transfusion lab week mascot was born.  He's still around.  I dare anyone to throw him away.

Cookie Differentials

This is actually the second time we've done this.  The two ladies in the picture were the originators along with myself and another who no longer works here.  I think we are also the only ones who participated in this--which is too bad because it is only the best activity that we have done.  Ever.  Basically, you decorate cookies to look like different types of red or white blood cells seen on a cell differential (a hematology test.)  We had to do thousands (an exaggeration?  I wish...) while we were students.  It's fun to know all our hard work paid off when we get to use our knowledge in fun ways.

Here are mine for the year: a megakaryocyte (which would have looked so much more awesome with whoppers instead of raisins,) a howell jolly body in an erythrocyte, a lymphocyte with an inclusion which I can't remember (but I'm sure this all sounds like latin anyway, so it doesn't matter) and a neutrophil in a patient with Chediak Higashi syndrome.

The best part is being able to eat them.

Monday, May 6, 2013

Volcano!

For preschool a few weeks back, we had a Luau theme.  It was really anything related to Hawaii but the other 'L' themes (from the site I get my theme ideas from) seemed sort of Lame.  haha...  So Luau it was.  We learned about beaches and oceans too.  My daughter seemed to really like it.

The part she liked best, however, was SCIENCE!  That 'a kid.  Naturally, we had to make our own volcano.  I'm sure every parent in america remembers doing this when they were kids, even going so far as to build a paper mache cone and awaiting anxiously the "lava" that erupted.  Every parent but me, that is.  I had never done this before.  So it was a true science experiment for both of us.


Rather than go the fancy paper mache route, we just used an old sparkling cider bottle that we had.  Luckily I had the foresight to put the experiment in an easy-to-clean mixing bowl. 

I put a few table spoons of baking soda in the bottle, along with a few drops of food coloring for effect.  I added the vinegar and waited for the explosion, and...nothing.  Not at all worried, I grabbed the bottle, put my thumb over the hole and shook it up a little bit.  Then I poured in A LOT of vinegar and the lava started to flow!  My daughter was so excited!


Okay, I was a little excited too!

Tuesday, April 9, 2013

I peruse a lot of blogs (and I mean a lot) on my downtime at work: craft blogs, mommy blogs, food blogs...and it leaves me a bit discouraged.  I have zero (like, literally) downtime when I am at home.  (Okay a slight exaggeration--but I've been saving that spare 45 minutes an evening to watch the Office with my husband.  I call it my golden time.) 

Anyway, I collect countless things on Pinterest that I am going to do "some day."  Only recently have I truly started to accept that my kids are my job right now (I know--2 kids in and I'm just barely figuring this out) and that everything else is just going to have to wait.

I'm not abandoning this blog: I am still slowly getting my craft room put together piece by piece (it actually looks really good!) and I do still love to bake with my daughter, but I just have very little that is exciting enough to share.  As if my post on short ribs weren't a good indicator :) 

One of these days I'll take a picture of the pegboard my husband built for me.  It is awesome.  And pretty.  Pretty awesome.

Monday, March 11, 2013

Slow-Cooker Short Ribs

I found some short ribs on sale at our grocery store last week (under $3!!) so I bought them but I didn't actually know how to cook them.  I did a quick search on my phone and found a recipe for slow-cooker ribs.  I have since then closed the webpage, but I'll try to remember it off the top of my head.

  • 1/2 c ketchup
  • 1/2 c honey
  • 2 T Worcestershire sauce
  • 2 cloves garlic (I used 2 t garlic powder)
  • 1 onion (I didn't have one so I used dried onion)
  • Boneless pork short ribs
Mix together ketchup, honey, Worcestershire sauce and garlic.  Place onions on the bottom of a slow-cooker with ribs layed on top.  Pour the mixture on top of ribs and onions.  Cook on low for 8 hours.

These are SO DELICIOUS!  My husband said that it tastes just like the ribs he makes but he uses bottled Sweet Baby Ray's Barbecue sauce instead.  Not that the mix was hard to make, but pouring it out of a bottle sounds much easier.

Monday, March 4, 2013

Easter Banner

I started writing this post last year (which is why all of the pictures say "2012") but when I realized I was actually closer to this Easter, I decided to wait.

Our home seems to be lacking in decorations for all of the holidays besides Halloween and Christmas.  I found a tutorial for making this cute banner for Easter. 

I call this project a "breakthrough project" for me becuase I finally learned how to properly modge podge.

Exhibit A

Can you tell a difference?


Exhibit B

How about now?


See, no one ever actually told me you were supposed to sand down the edges.  It makes for such a neater finish.  Since then, I have been much happier modge-podge  ing.

Anyway, for this project I just bought a dozen or so ovals (or eggs) and modge-podged each of them with a different spring-ish colored paper.  Then I cut out the letters to spell "Happy Easter" with my Slice.  Then I freehanded paper pieces to make little chick and bunny faces.  I had to use a heavy duty hole punch to cute holes in each egg and then I tied each of them together with a different color of ribbon.  I think it turned out pretty cute, if I do say so.  We'll see how it fared in storage from the past year...


Monday, February 25, 2013

Pesto Salad

I love finding recipes that my picky-ish daughter will eat.  Even better when I like them.  Even better when they are actually good for you!  I found this one here.

Pesto Salad with Chicken, Feta and Tomatoes
  • 1 pkg bow tie pasta
  • 1 T olive oil
  • 1 c basil pesto
  • 1/4 c Italian dressing
  • 1 c grilled chicken
  • 2 c spinach
  • 1 pint cherry tomatoes
  • 1/2 feta cheese
  1. Cook the bowtie pasta according to package directions in a large pot of salted water.  Drain the pasta.  Drizzle with olive oil and stir around.
  2. Put the pasta in a large serving bowl and stir in the pesto and Italian dressing.  Add the spinach, cherry tomatoes and feta cheese.  Toss to combine.  Salt and pepper to taste.
  3. Cover the pasta and refrigerate.  If the pasta seems dry before serving, you can stir in another tablespoon of olive oil.

Monday, February 4, 2013

Rocky Road Brownies

Alright, maybe my quest for the perfect brownie isn't over quite yet.

These were good, but messy. USE NONSTICK FOIL.  And lots and lots of nonstick cooking spray, otherwise you'll lose half of the brownie to the pan.


  • 2/3 c unsweetened cocoa powder
  • 1/2 c all-purpose flour
  • 1/2 t baking powder
  • 1/8 t salt
  • 1/3 c canola oil
  • 1/3 c granulated sugar
  • 1/3 c packed light-brown sugar
  • 4 egg whites, lightly beaten
  • 2 t vanilla extract
  • 1/2 c finely chopped walnuts
  • 1/4 c mini chocolate chips
  • 1/2 c mini marshmallows
  1. Heat oven to 350.  Line an 8 x 8-inch baking pan with nonstick foil, overhanging ends of pan.
  2. In medium-size bowl, combine cocoa powder, flour, baking powder and salt.  Set aside.
  3. In a large bowl, whisk together oil, sugars, egg whites and vanilla.  Stir in cocoa mixture.  SPoon batter evenly into prepared pan.  Sprinkle walnuts over batter.  Bake at 350 for 25 minutes.  Scatter teh chips and marshmallows over the top and bake for an additional 5 minutes.  REmove from oven and cool completely.
  4. Tpo slice, coat a sharp chef's knife with cooking spray and cut into 25 squares, using a rocking motion.  Re-spray knife frequently.

    Monday, January 28, 2013

    My First semi-Homemade Pie. Ever.

    I was having one of those "being a mom is so hard" kind of days when my husband told me that he was taking the kids and for goodness sake would I go do something for myself.

    So I decided to make a pie.

    I've had the Crisco recipe for pie crust on my fridge for weeks now but I keep finding an excuse not to use it because, after all, the idea of making a pie absolutely terrifies me.  I had, however, purchased some canned cherry pie filling so at least I didn't have to think past the pie crust.

    I made 3 big mistakes:

    1. I did not chill the shortening nearly long enough. 
    2. My water was not icy cold.  And I added too much of it.
    3. Apparently it takes 2 cans of filling to make a pie.
    Here is my first semi-Homemade cherry pie:


    It didn't taste terrible.  Which is good.  But as I was lamenting my first trial with my husband he said, "Yeah, pies are really hard to make."  In spite of my 3 mistakes, my biggest frustration was actually tenting the outside rim with foil.  I baked the pie for 10 minutes and went to foil the edges and burned my thumb instead.  I guess you can foil the edges first and then take the foil off for the last 10 minutes as well; I didn't know about this option.  Also, I found out that they make silicone rims to make the whole process much easier.  Anyway, the edges of this pie ended up crispy.

    Move over quest for the perfect brownie recipe because I think I just found a new lifelong ambition.

    Next time I'm going to put my shortening in the freezer and a cup of water in the fridge.  Just to be safe.

    Sunday, January 20, 2013

    Fresh Broccoli Salad

    My coworker had a bridal luncheon a few months ago.  One of the ladies brought in a really delicious broccoli salad which another coworker requested that I find the recipe for.  I googled "Broccoli Salad" and found this one from allrecipes.com.  After I printed off a copy for this other coworker, I decided that it did, in fact, sound good enough to make myself so I gave it a try.  YUMMY!  Maybe one of the best broccoli salads I've had?


    Fresh Broccoli Salad

    • 2 heads fresh broccoli
    • 1 red onion
    • 1/2 lb. bacon
    • 3/4 c raisins
    • 3/4 c nuts
    • 1 c mayonnaise
    • 1/2 c white sugar
    • 2 T white wine vinegar
    1. Place bacon in a deep skillet and cook over medium high heat until evenly brown.  Cool and crumble.
    2. Cut the broccoli into bite-size pieces and cut the onion into thin bite-size slices.  Combine with the bacon, raisins, nuts and mix well.
    3. To prepare the dressing, mix the mayonnaise, sugar and vinegar together until smooth.  Stir into the salad, let chill and serve.

    Monday, January 14, 2013

    Black and White Chocolate Cupcakes

    I found this recipe in a BYU alumni article about the founders (who are BYU alumni) of one of my favorite bakeries: The Sweet Tooth Fairy.  (Another reason BYU is the superior school.  Ahem.)  I made these cupcakes a few weeks before Christmas. 


    I only had half of one before they had all vanished.  Not exaggerating.  That half that I DID have was very, very delicious.  Another plus?  They are super easy to bake.


    My daughter was in charge of the chocolate chip placement.  She also helped me swirl the frosting.  I think she did an excellent job.  (So does she.)


    Black and White Chocolate Cupcakes

    • 1 1/2 c all-purpose flour
    • 1 c granulated sugar
    • 1 c and 2 T dark chocolate cocoa
    • 1 1/2 t baking soda
    • 1 t salt
    • 1/2 c sour cream
    • 3 eggs
    • 3/4 c ready-to-eat chocolate pudding
    • 1/2 c butter, melted
    • 1 c semisweet chocolate chips
    1. Preheat oven to 350 F.  Line 24 cupcake pan cups with paper liners.
    2. In a large bowl, mix the dry ingredients together with an electric mixer on low speed for 30 seconds until well combined.
    3. Add wet ingredients and mix on medium speed for 1 minute.  Stop and scrape the sides of the bowl and resume mixing on medium speed for an additional minute.  Stop the mixer and fold in chocolate chips.
    4. Fill the prepared cupcake liners with batter 3/4 full.  Bake about 15-18 minutes in the preheated oven, until a toothpick inserted in the center of a cupcake comes out clean.  Let the cupcakes cool completely before frosting.
    White Chocolate Frosting

    • 8 oz. cream cheese, softened
    • 1/4 c butter, softened
    • 1 c white chocolate chips or 6 oz. white chocolate, melted
    • 1 t vanilla
    • 2 1/3 c powdered sugar
    1. To make the frosting, beat cream cheese and butter in a large bowl with an electric mixer on medium speed for 1 minute.  Add melted chocolate and vanilla; mix for an additional minute.  Add powdered sugar gradually, beating until light and fluffy after each addition.
    2. Spread the frosting on the chocolate cupcakes.  Garnish with fresh raspberries, chocolate chips, or chocolate sprinkles.

    Monday, January 7, 2013

    Craft Room: Update

    I haven't been as good as I had planned on being on updating the progress of my new room, but we are nearly finished!  My husband has been hard at work getting things painted, installed, and built.  I've been busy sorting and organizing.  Here are a few pictures of our progress:

    We bought this shelving unit at IKEA after seeing one in a friend's craft room.  As you can tell, I have hardly filled it up...which means I need to do some shopping!


    I was in desperate need of some workspace.  My old 12x48 workspace, which I used all of the time, just wasn't enough.  So I proposed an idea for a work table to my husband and he built it for me--like, in a day.  He's amazing.  I would have been happy with just a slab of particle board, but he went a step further and trimmed it out in decorative edging.  It looks fantastic!


    That box on my desk and the bag to the left of it (hard to see) are full of things that I have acquired and need to be organized since this project began.  I think I have a problem.

    I had to go buy a third paper organizer.  It was on clearance which makes me think that Hobby Lobby might not be stocking them anymore.  That makes me nervous; I'd better stop buying paper.  (Yeah, right.)  There is a collapsible hobby table that I found at Joanns that we allowed space for (folded up) between the paper organizers and my desk.


    My closet is one of my most favorite things about my room.  There is so much room in there that, again, it will take me awhile to fill it up.  I wanted to keep my modular organizers (previously part of my desk) so S built the shelves to accomodate them (I even have room for a few more.)


    Finally, it's hard to tell, but in the previous picture and the next picture, you can see an angled wall that I haven't quite known what to do.  I found a giftwrap organization method on Pinterest that I thought would be ideal in this spot.  I've always wanted to get my giftwrap out and on display: it can be so pretty!


    Even since I took these pictures a few weeks ago, we've made a lot of progress.  I am confident that by the end of January everything will be installed and I'll be ready to play again!